What To Do With That Great Photo That’s Not Quite Technically Perfect
"What a great photo! Oh wait... it's blurry."
It's happened to the best of us. Even professionals. Sometimes in photography we take pictures that we would've really liked but they've come out slightly blurry, or they have too much digital noise from a high ISO, or maybe they were taken with an older camera that had a low megapixel count or quality not up to today's standards. It might be an awesome wildlife image of a rare animal, the sunrise over the Caribbean, a spontaneous photo from a family outing, or an architectural photo from some far away place. Often these otherwise great photos get deleted or just sit unused in a folder on your computer. The good news is there are many ways these photos can still be useful, even for producing art to hang on the wall.
Of course you can always try to sharpen up a blurry photo or reduce digital noise, and there are some great products that can do this for you. The purpose of this post though is to provide some ideas as to what to do with those photos when even the best software can't quite fix your photos 100%.
Wall Art on Alternative Media
One of my favorite ways to save photos that might otherwise be too blurry or too noisy for "traditional" prints is to print them on alternative media, such as canvas or wood. Not only do these surfaces create amazing pieces of art, but they help mask minor imperfections in the original photo. I recently wanted to make a print of an American Bison for a Western-themed wall, and all of the photos I'd taken with a 21mp Canon 5D Mark II were sharp and clear, but the subject matter didn't fit the wall. I found a much older photo of a bison on my hard drive taken with a 10mp Canon Rebel XTi, that I liked better. I decided to print the Rebel XTi photo on wood and it looks absolutely spectacular (Photo printed on wood by woodsnap.com).
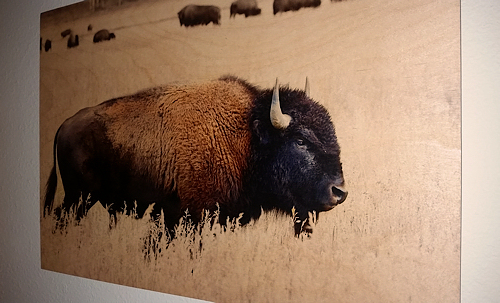
Bison Printed on Wood
Similarly, I have several very large canvas prints (36" x 24") that look great, even with photos of relatively lower resolution.
Gifts and Other Items
In addition to wall art, there are plenty of other items that you can print on these days. Everything from custom pillows and blankets, cellphone cases, shower curtains, candles, kitchen aprons, puzzles, playing cards, there are so many possibilities. The quality of the photo doesn't have to be the same as if you were printing a poster-sized wall hanging. Photos that are of "decent" quality will do just fine for many of the items mentioned above.
Social Media
If you're not printing the photos to a physical product but still want to make use of them digitally for sharing on social media, there are still many of ways to make them usable. If your photo has noise from a high ISO, one of the easiest ways to mask this is to simply convert to black & white. The most problematic noise is generally "chroma noise" which you see as all the tiny multi-colored dots. When you convert to black & white, this noise looks more like grain in old b&w film and is much less noticeable.
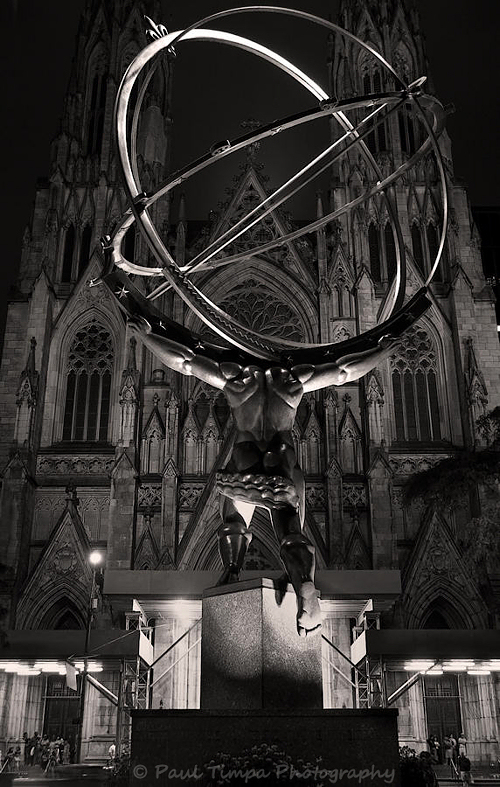
Statue of Atlas, Rockefeller Center, NYC
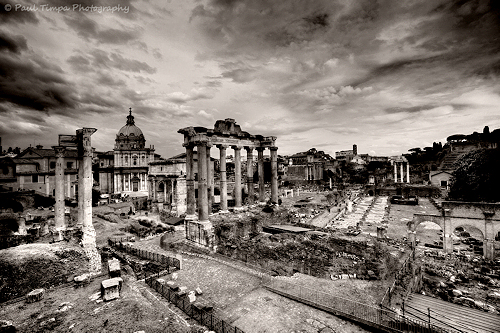
Both noise and blurriness are less visible when the size of the photo is smaller on-screen. Rather than post the photo to social media on its own in full resolution, you can reduce its size and include it as part of a collage or other multi-photo image. This allows you to include the image in context with other images taken at a similar time, and it's also easier for friends and family to share a single post (that contains multiple pictures) than to share many individual posts. Below is a photo grid of three city scenes from Rome, Paris, and NYC:

Photo Grid -- Timpa Photography
Even if a photo is not blurry and looks fine, I often include it as part of a collage for these same reasons. Mobile apps like "Photo Grid" for Android are great at creating collages, and also include some editing tools (brightness, contrast, saturation, tint, crop, etc.) as well as filters.
Filters
There are countless ways to apply filters that will not only enhance your photos, but also help hide imperfections. If your photo is slightly blurry, perhaps you can go for a tilt-shift Lensbaby type look to give it a dreamy feel. If the colors are muted, or the noise is high, you can try an oversaturated, high-contrast "edgy" look. Explore all of the filters or features of your editing software to see what works for your particular image.
Roman Forum, Italy
Conclusion
Just because a photo hasn't come out technically "perfect", doesn't mean you have to deal with no photo of the occasion. With a little creativity you can bring new life to those old photos and they can take their rightful place on your wall, either in the real world or on social media!
For those looking to improve your photography, I've also created an app for Android which teaches photography and how to get photos like these while you're out taking pictures. It's perfect for when you're traveling. Click here:
Photography Trainer for Android
Photography Trainer iPhone app
If you find this guide helpful, please share it:
![]()
If you have any questions about the locations or photo techniques, please feel free to ask any time. You can also become a fan at my Photography Facebook page, add me to Google+ circles, or follow me on Twitter for more photography tutorials and tips:
Thanks for reading, and best regards,
Paul
If you'd like to purchase prints or stock photography licenses for my photos (for advertising and editorial use), please visit:
http://www.timpaphotography.com/purchase
Copyright 2014, Paul Timpa
How to Photograph the Milky Way
Photographing the Milky Way
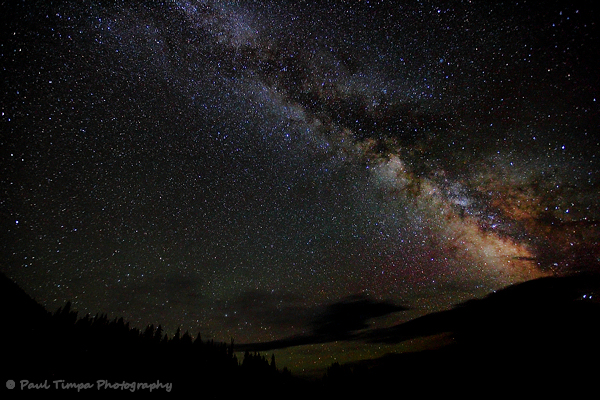
Milky Way
When you photograph the Milky Way, you can produce some of the most spectacular night sky images you can create. It’s also fun and relatively easy. The Milky Way is visible with the naked eye all through summer in both the Northern and Southern Hemispheres. The hardest part is not actually the photography, but finding a great location to shoot that is dark enough to see the stars!
Let’s start with the basics. For equipment, all you’ll need is a D-SLR that has good low-light performance, a wide-angle lens, and a tripod. If your D-SLR goes to at least ISO 3200 or higher, you should be able to try this technique. If you have a shutter release remote control you can use that as well.
Location
As mentioned above, the hardest part about photographing the Milky Way is simply finding a place that’s far enough from city lights to have a dark sky that shows off the stars, and to choose a night where the moon is not shining at the time of your photo shoot.
If you live in a more rural area, it may be easy to find a location near a farm or field or on a less-traveled road where you’re far from city lights. If you live closer to a city, you can always plan your photoshoot for when you’re away on vacation somewhere farther away from a big city. I like shooting out in the American West by the National Parks. Caribbean islands and beaches are also great places for photographing the stars.
It’s easy to pick a night when the moon won’t interfere with your shoot. Just Google the name of the place where you’ll be photographing with the words "moonrise time". For example, for Jackson, Wyoming just Google "jackson wy moonrise time" and you’ll see plenty of webpages which will show you the moonrise time for the days of that month. Pick a day when the moon will rise after you’re done with your shoot. You can also choose a day when there is a "new moon" -- no moon shining at all. Be sure to watch the weather forecast so you can photograph on a day predicted to have clear skies with no clouds.
The Photo Shoot
On the night you’re planning your photography, remember to bring your camera, tripod, a flashlight, and warm clothes depending on the weather.
Once at your location, let your eyes adjust to the darkness for a least a few minutes. You may want to set up your tripod and camera with your flashlight before you let your eyes adjust.
If you’re shooting on a clear night in the summer you should be able to see the Milky Way with the naked eye. If you’d like some assistance locating the Milky Way, a star viewing app for your smartphone such as Stellarium can be very helpful. With Stellarium, you actually hold your phone up to the sky and the app shows you what you’re looking at as you move your phone around. It’s fantastic.
When you’ve located the Milky Way and you’re ready to photograph, it’s time to set the camera.
Use RAW, set the camera to manual exposure mode and start with an ISO around 3200. Set the widest aperture (preferably F2.8 or wider) on your widest angle lens. Lenses in the 16-24mm range (full-frame equivalent) work best. The wider the angle on your lens, the less you’ll see movement and blurring of the stars from the rotation of the earth.
Set the shutter speed to between 20 and 30 seconds.
For focus, use Manual Focus. Autofocus won’t work in the dark. If your camera has a Live View LCD, use it and manually focus on the brightest star you see, in magnification mode if available. If your camera doesn’t have Live View, set the focus to infinity. While not ideal, setting to infinity will get you close. You can always review the test shots and tweak focus as needed.
When the exposure and focus are set, aim the camera toward the Milky Way and take a test photo. If there are foreground elements in the photo, make sure they are level and look how you envision. Adjust the ISO and shutter speed as necessary, ensuring that the shutter speed doesn’t get so long as to blur the stars into little streaks.
Enjoy!
That's all there is to it. Experiment with a variety of exposures, foreground elements, and compositions. In your photo editing software, you can adjust brightness and color temperature to finalize your amazing night sky. Most importantly, when you're done with the photography, don't forget to just relax and enjoy the beautiful stars.
For those looking to improve your photography, I've also created an app for iPhone / iPad / Android which teaches photography and how to get photos like these while you're out taking pictures. It's perfect for when you're traveling. Click here:
Photography Trainer for iOS and Android
Photography Trainer iPhone app
If you find this guide helpful, please share it:
![]()
If you have any questions about the locations or photo techniques, please feel free to ask any time. You can also become a fan at my Photography Facebook page, add me to Google+ circles, or follow me on Twitter for more photography tutorials and tips:
Thanks for reading, and best regards,
Paul
If you'd like to purchase prints or stock photography licenses for my photos (for advertising and editorial use), please visit:
http://www.timpaphotography.com/purchase
Copyright 2014, Paul Timpa
How to Use Layers in Photo Editing Software
Introduction to Using Layers

Grand Teton National Park
Using layers in your photo editing software is one of the most important things you can do to create great images. Layers are so powerful, even the most basic understanding of them can improve your photography tremendously.
I've written a tutorial on how to use layers to create amazing images, and it's published on the fantastic Digital-Photography-School.com website. Click here to read it:
http://digital-photography-school.com/beginners-introduction-using-layers/
To keep up-to-date with the latest photo additions and other topics, you can become a fan at my Photography Facebook page, add me to your Google+ circles, or follow me on Twitter:
Paul Timpa Photography's Facebook
If you'd like to purchase prints or stock photography licenses for my photos (for advertising and editorial use), please visit:
http://www.timpaphotography.com/purchase
Copyright 2014, Paul Timpa
App to Learn Photography and Camera Settings — Photography Trainer New Release
Photography Trainer for iOS & Android
The best-selling app to learn photography and camera settings, Photography Trainer, has just been updated with fantastic new features. Both the iOS & Android versions have beautiful new designs. The iOS version now includes the all-new iPad version with high-resolution photos for free.
Photography Trainer has long been a favorite of photographers looking to master their D-SLRs. Over 50,000 people use the app to learn how to set their cameras to take amazing photos. The new designs feature high-res images, auto-rotate, new photos and tutorials, and an improved interface.

Photography Trainer app
Click here for more information or use the links below to download.
www.timpaphotography.com/photographytrainer
Download here:
iOS version of Photography Trainer (iPhone, iPad, iPod touch)
Android version of Photography Trainer
You can also download the Android version from Amazon.com here:
Android version of Photography Trainer on Amazon.com

Photography Trainer app for iPad
If you have any questions, please let me know any time at PhotographyTrainer@yahoo.com
Media, editors, and bloggers can download a press kit here: Press Kit
Thanks,
Paul
![]()

Na Pali Coast, Kauai, Hawaii

Oxbow Bend, Grand Teton National Park

St. Peter's Basilica, Vatican City, Italy
Where to Photograph in NYC — New York City Photo Opportunities
Best Places to Photograph in NYC

NYC Skyline
NYC has amazing photo opportunities around every corner. From skylines and night photography, to portraits, architecture, street photography, and even wildlife, NYC has it all.
This guide to the best places to photograph in NYC will highlight many of the popular locations so you can capture that magic image.
Brooklyn Bridge from Brooklyn Bridge Park

Brooklyn Bridge, NYC
Brooklyn Bridge Park is one of the very best places to photograph the Brooklyn Bridge with the NYC skyline in the background. It’s very easy to get there via subway. You can also walk right over the bridge from Manhattan. Be sure to take your wide-angle lens and your tripod. Sunset and "blue hour" are fantastic times for photos. Blue hour is the brief period right after sunset, but before it's fully dark. The photo above was taken shortly after sunset.
As an added bonus for this location, the Manhattan Bridge can be photographed from here.
Wall Street, New York Stock Exchange
Wall Street and the area around the NYSE area can be a great place to capture the hustle and bustle of life in the city. The subway goes right to Wall St., so this is another area that is easy to get to. The photo below was taken from a set of stairs across the street from the NYSE.

New York Stock Exchange -- Wall Street
Rockefeller Center & Radio City Music Hall
The Rockefeller Center / Radio City area in midtown provides many great photo opportunities.
The photo below of the Rockefeller Center ice skating rink and Christmas Tree was taken during the holiday season in New York.

Rockefeller Center Ice Skating, NYC
This photo of Radio City Music Hall was taken from a tripod at 6th ave and 50th street.

Radio City Music Hall, NYC
This is the statue of Atlas at Rockefeller Center, with St. Patrick's Cathedral, taken from 5th ave between 50th and 51st streets.
Statue of Atlas, Rockefeller Center, NYC
The following is a street scene in the Rock Center area:

Rockefeller Center and Radio City, NYC
From this area, you can also take an elevator to the "Top of the Rock" observation deck which provides incredible views of the city.
Skyline from Gantry Plaza State Park
If you’re looking to a get a super-wide skyline shot, Gantry Plaza State Park right across the East River is a great place to do it. You can take the subway (#7 train or G train) to the park. The following NYC skyline photo was taken from Gantry Plaza State Park just after sunset during "blue hour".
NYC Skyline
South Street Seaport
The South Street Seaport is a fascinating place with endless photographic opportunities, from the pier to the ships to the river.

South Street Seaport, NYC
The photo below of the South Street Seaport was taken from the pedestrian walkway on the Brooklyn Bridge.

South Street Seaport, NYC
You can also take photos of the Brooklyn Bridge from the South Street Seaport. The following photo was taken from the Seaport during the "Waterfalls" art installation.

Brooklyn Bridge, "Waterfalls" art installation
Times Square
Times Square is of course one of the iconic locations in NYC. There are countless photo opportunities here, so take your time and explore.
In this more “abstract” shot, my goal was to capture the energy of Times Square. This was a panning shot...

Times Square Taxi, NYC
Grand Central Station
Grand Central Station is one of the major transportation hubs of New York City. 750,000 people pass through every single day! While tripods are not allowed to be set up in Grand Central, there is a short wall by one of the sets of stairs where you can rest your camera to take a long exposure such as the one below.

Grand Central Station, NYC
Empire State Building
There are many places to photograph the Empire State Building, which is located at 34th st and 5th ave. This photo is taken from Brooklyn through the structure of the Manhattan Bridge. You can also get great photos from up close, or from up high such as from the observation deck at “Top of the Rock”, Rockefeller Center.
This photo was taken with a telephoto lens from Brooklyn, near Brooklyn Bridge Park which was discussed above.

Empire State Building through Manhattan Bridge
Central Park
There are so many wonderful photo opportunities in Central Park.
One of my favorites is of “Literary Walk”.

Central Park, NYC
Bow Bridge on "The Lake" provides a peaceful scene to photograph, and is a great place to relax.

Bow Bridge, Central Park, NYC
The Ramble in Central Park is one of my most favorite places to go, both for photography and for relaxation. You wouldn't think you could find scenes like this right in the middle of NYC!

The Ramble, Central Park, NYC

The Ramble, Central Park, NYC
Some other great places to photograph in Central Park are:
* Central Park Boathouse on “The Lake”, where Venetian-style gondoliers transport guests over the lake
* The Great Lawn is a fantastic place to photograph people enjoying the outdoors
* Bethesda Fountain
Roosevelt Island
Roosevelt Island is a place where you can get great skylines and bridge photos. You get to Roosevelt Island via the Roosevelt Island Tramway, which is a short “gondola” ride over the East River. The following photo of the 59th Street Bridge and the Tramway was taken from Roosevelt Island facing Manhattan.

Roosevelt Island Tramway, NYC
The photo below of the East River was taken from the Roosevelt Island Tramway as it crossed the river.

East River Sailboats, NYC
Washington Square Park, Greenwich Village, East Village
Washington Square Park is in the heart of the "Village" area of NYC. Walking west takes you right into Greenwich Village, while walking east takes you into the East Village. Both present great photo opportunities. The photo below is of the arch in Washington Square Park.

Washington Square Park, NYC
Columbus Circle
Columbus Circle is on the southwest corner of Central Park, and marks the beginning of the Upper West Side. The photo below is of the fountains in Columbus Circle.

Columbus Circle, NYC
Central Park Zoo
If you want to capture some wildlife photos, the Central Park Zoo provides plenty of opportunities. As you can see below, even the NYC monkeys are cool.

Central Park Zoo, NYC
Other Photo Opportunities
The locations presented above highlight some of the more popular photo opps. There are of course so many other opportunities in NYC, including the Statue of Liberty and the rest of the boroughs. The photos below are some additional images from around the city.
If you can get up high, you can capture fantastic photos of the rivers and skylines.

East River Sunrise, NYC
This is a photo of the skyline reflected in a wine glass.

NYC Skyline in Wineglass
This photo of lightning over the East River was taken from a tripod.

Lightning over East River, NYC
The following two photos of the Brooklyn Bridge were taken from from Brooklyn Bridge Park and from standing on the bridge.

Brooklyn Bridge, NYC

Brooklyn Bridge, NYC
And lastly, the sun sets over NYC.

NYC Sunset
There are so many photo opportunities in New York City, you can explore for a lifetime. I've provided just a sampling of photo opps as inspiration for you own photos, and to highlight some of the more popular locations.
For those looking to improve your photography, I've also created an app for iPhone / iPad / Android which teaches photography and how to get photos like these while you're out taking pictures. It's perfect for when you're traveling. Click here:
Photography Trainer for iOS and Android
Photography Trainer iPhone app
If you find this guide helpful, please share it:
![]()
If you have any questions about the locations or photo techniques, please feel free to ask any time. You can also become a fan at my Photography Facebook page, add me to Google+ circles, or follow me on Twitter for more photography tutorials and tips:
Thanks for reading, and best regards,
Paul
If you'd like to purchase prints or stock photography licenses for my photos (for advertising and editorial use), please visit:
http://www.timpaphotography.com/purchase
Copyright 2014, Paul Timpa
Travel Photography: How to Prepare for Your Trip
Preparing for Travel Photography

Colosseum, Rome, Italy
Going on a trip where you'll be taking photos can be one of the most exciting photography experiences you can have. Whether it's simply going on vacation, or a dedicated trip specifically for travel photography, you’ll want to be prepared. This guide will help you get there and highlight some of the things you need to think about.
So let’s get started!
Gear
You should always bring all the photography gear you’ll need with you. Assume that you won’t be able to acquire any photo equipment at your destination. While it may turn out that there is a photography shop nearby, it’s better to play it safe. I suggest making a list of all your gear on your computer. Then before every trip you can print it out and check that each item is packed. I go the extra step and actually set everything up, power on the camera, put it on the tripod, etc. This way nothing can be forgotten. (For example, one time I almost left without the quick-release plate for my tripod, something that would have been easy to miss had I not actually tried to mount the camera).
Here is a simple list to get you started:
* Camera
* Camera Battery in the camera + extra batteries
* Battery charger
* Memory Card in the camera + extra memory cards
* Tripod and tripod attachments (e.g. Quick release plates, heads, etc.)
* Remote control for shutter
* Filters + filter holders
* Flash + flash batteries
* Ziploc bag (quick rain protection)
* Cable to connect camera to computer
* Electric plug adapters (for international travel)
* Backup point-and-shoot camera with battery, charger, and memory cards
Take special note of that last item. Cameras can fail, break, or get lost. You don’t want to be on the trip of a lifetime and have your only camera fail, leaving you with no other option to take photos. Always bring a backup camera, even if it’s an inexpensive point-and-shoot. You may not get the highest-quality photos, but at least you’ll have something.

Positano, Italy
Photo locations
Now for the fun part -- figuring out what you want to photograph at your destination!
There are many ways to determine some of the key "must have" photos from any particular location. I usually use three ways:
First, I’ll simply do some Google searches about the destination to see what comes up. In addition to researching the destination in general, I’ll usually search for something like “Where to photograph in [insert destination]” as well.
Secondly, I’ll buy guide book or two. These are great not only to highlight the key places to see, but are also super helpful overall for things like hotels, restaurants, etc. The popular ones are usually very good, such as Fodor’s, Frommer's, and Lonely Planet.
Lastly, I’ll go to a photo sharing site like Flickr or Google+ and search on the destination to see what’s popular to photograph.
When I get to the destination, I’ll look at the postcard rack to see what else looks interesting, and of course I'll talk to locals to get their input as well.
If you use the methods above, you’ll have a good chance of getting to all the key photo opps.
Once you've identified where you want to photograph, it's time to create the “plan” to get all the photos.
The first thing to do is figure out how many sunrises and sunsets you’ll have, since many of your photographs will likely occur at that time. You’ll get a sunrise & sunset for each full day you’re there, and depending on what time of day you’re traveling, maybe a sunset on the day you arrive, and a sunrise on the day you leave. Subtract out any sunrises / sunsets where you’re doing something besides photography (you might want to have a nice meal along the beach at sunset, y’know!)

Costa Rica Sunset, Mal Pais
Once you know how many sunrises / sunsets you have, just look at your list of photo locations and assign them to the days of your trip. Do the important ones first -- this way if the weather is bad and you don’t get a shot the first day, you can go back the next day and try again. The photos you don’t get to will be the least priority ones.
Especially for the sunrise / sunset photos, I recommend scouting the location in advance during the day. The window for photography at sunrise / sunset is very small. You don’t want to find out on the morning of the shoot that you don’t know where to park, that there’s a huge construction site in front of the location, or any host of other things. Go to the site during the day, confirm you know how to get there, exactly where you’re going to shoot from, etc. Then you can just go to the spot the next day, worry-free, and take the shot.
Use a sunrise / sunset calculator to determine your shooting times. I like the one below -- it also shows “civil twilight” which loosely translates to blue hour. Enter the location and dates you'll be traveling:
Determine if there is a particular direction you need to be facing. For example, the Grand Teton mountains are generally photographed when facing straight west, so they are usually photographed at sunrise when the sun is behind you and shining on the mountains. If you’re trying to get the NYC skyline with the sun rising behind it, you’ll want to be facing east and take the photo from the New Jersey side of the river. If you want the sun setting over the skyline, you need to face west and take the photo from Queens / Brooklyn. These are the types of things to think about.

NYC Skyline
Whether it’s a sunrise / sunset photo, day photo, or night photo, group the locations together so you can shoot the ones that are close together on the same day if possible.
Bring a paper map just in case GPS navigation doesn't work. Once I have my photo plan, I’ll use Google maps to get directions from one place to another, and I’ll print those directions to bring with me. Then I don’t have to worry if I don’t get a good GPS signal.
Also put some thought into what locations might be OK to shoot even if the weather is bad. You might not think of a gray rainy day as a worthwhile day for photography, but maybe the location lends itself to black & white photography, so getting warm light isn't necessary.
Don't forget there is more than one way to shoot a popular location, as illustrated below in two very different takes on the Eiffel Tower:

Eiffel Tower, Paris

Eiffel Tower, Paris
Traveling with your gear
Once you've identified everything you’re bringing and you've got your photography plan, it’s time to pack and travel. Traveling with your gear can present its own set of challenges. Firstly, if you’re flying, you must take your camera, memory cards, and accessories with you on the plane as a carry-on. It’s not wise to check your expensive and fragile equipment, that could get lost or damaged. Either put it in your luggage that can go in the overhead bin, or use a photo backpack that you can put under the seat. You can use a compact tripod with four-segment legs that will fit in many carry-on sized pieces of luggage. My four-segment compact tripod is my only tripod and it works great.
Be sure to use a foam-padded backpack or case, or at least wrap your camera in towels or clothes to protect it from the bumps of travels. Put in the center of your luggage, not near the edges where impacts can damage it.
If you’re traveling internationally, be aware of customs rules. There are some rules regarding purchasing equipment in other countries and returning with it, so if possible have a receipt or just some way of explaining that the gear is yours and was not purchased on the trip.
When you get to your destination, always be aware of your camera equipment. Never leave it unattended. If you’re going out on the town without your D-SLR and it fits in the hotel safe, then put it in the safe along with the memory cards.
Backup
OK, so you got to your destination, executed your plan, and you captured some amazing photos. Congratulations! Now it’s time to back everything up. It’s incredibly important to backup your images while you’re traveling, as soon as you possibly can after taking them.
The simplest and most familiar way is to bring a laptop and transfer the images to the hard drive. You can also buy a portable memory card backup device with a hard drive, but the laptop has a significant advantage: You can email the photos to yourself, upload to “the cloud”, or burn CDs from a laptop. This is important because if at all possible you should try to have backups that are not with you physically. If all of your backups are in your bag and it gets lost, you’ve lost everything. With a laptop, you can (and should) upload important photos to “the cloud” (a dropbox, your own server, etc.) or at the very least email a few photos to yourself. You can also burn a CD and mail it to yourself if necessary. This way, if something happens to your gear, you’ll still have the images in the cloud, your email, or waiting at home in your mailbox. I also connect an additional portable hard drive to the laptop via USB to create a second copy while I'm there.
Don't plan on using a "public" computer at your destination, such as in the hotel business center or Internet cafe. Often public computers have safeguards that will prevent you from plugging in your camera and/or hard drives.
South Street Seaport, NYC
Closing
Travelphotography can be one of the most rewarding types of photography. Not only do you capture memories to last a lifetime, but you get to share those beautiful locations with everyone. Perhaps you might even inspire someone to travel there too.
My last point in this guide is probably the most important: Remember that you’re traveling and experiencing amazing things. Don’t get lost in the photography while forgetting to experience the moment. If there is a stunning sunrise, photograph it, but remember to put the camera down for a few minutes, forget about the photography, and enjoy life.
Enjoy!
Best,
Paul
I've also created an app for iPhone, Android, and iPod Touch which teaches you photography -- more info can be found here:
Photography Trainer for iPhone and Android
Photography Trainer iPhone app
To keep up-to-date with the latest photo additions and other topics, you can become a fan at my Photography Facebook page, add me to your Google+ circles, or follow me on Twitter:
Paul Timpa Photography's Facebook
Share this guide:
![]()
If you'd like to purchase prints or stock photography licenses for my photos (for advertising and editorial use), please visit:
http://www.timpaphotography.com/purchase
Copyright 2014, Paul Timpa
Where to Photograph in Grand Teton National Park
A Photography Guide to the Grand Tetons

Snake River Overlook, Grand Teton National Park
Grand Teton National Park has some of the most beautiful scenery in the U.S. It's a fantastic place for photography. I've written this guide to highlight some of the best places to photograph in the Grand Tetons.
First, it’s worth understanding the layout of the park. The Teton mountains runs north-south. There are two primary roadways around the park, and both run parallel along the Tetons. Both of these roads are on the eastern side of the mountains, so you’ll be looking westward for your photographs.
This guide focuses on the outer road where you can find many of the most iconic and famous viewpoints of the Tetons. It’s a highway and can be accessed all year round. The inner road also has many viewpoints and will be discussed as well, but note that it is closed in winter.
We’ll start our tour traveling south out of Yellowstone National Park into Grand Teton National Park. All through this guide I’ll include links to the various photography sites on Google Maps, so you’ll be able to find any of the locations even if you don’t follow the route below.
The road that heads into the Tetons from Yellowstone is Hwy 89/191/287. As you drive south from Yellowstone into the Tetons on this road, you’ll first pass Jackson Lake. Here you’ll get your first glimpse of the Tetons up close. FYI, Jackson Lake Lodge is along this route, and you can stop into the lobby to gaze through the large picture windows.
To get to the major photography sites, continue traveling south until the highway splits into the parallel roads that I mention above. These two roads form the Teton loop, along which you can stop to take your pictures.
Here’s the split:
For any of the maps in this guide, you can send the link to your mobile phone and if your phone supports it, you can use GPS navigation to navigate directly to the site.
The outer road (further from the Tetons) is where many of the popular viewpoints are located, so we’ll start there.
Oxbow Bend
To reach the first major photography spot, Oxbow Bend, you’ll travel onto the outer road from the split, so stay on Hwy 89/191/287 as it heads east / south and go one mile.
Oxbow Bend, Grand Teton National Park
The Oxbow Bend viewing area is very easy to see. The area is right off the main road. You may notice many people photographing right from the parking lot, but the best view is a short walk down to the water's edge. After parking your car, walk north a little bit along the road and you'll see foot trails through the long grass where people have made their way down to the water. If you don't see any trails, just blaze your own -- it's a very short walk down to the water. From there you'll have unobstructed views of the mountains and you'll be able to get beautiful reflections.
The photo above was taken at F8 for 1/160th sec, ISO 100 at 75mm (full-frame equivalent).
Oxbow Bend is here:
Snake River Overlook
The next stop is the famous Snake River Overlook. Snake River Overlook is where Ansel Adams made his iconic photograph of the Tetons.
From this overlook, you're facing West so be there for sunrise. When the sun rises behind you in the east it illuminates the Tetons and the landscape below with a wonderful glow.
Snake River Overlook, Grand Teton National Park
The area where you can set up your tripod for the best shot is not that wide, so get there early so you can get a good spot.
The above photo was taken with a Canon 5D Mark II on a tripod, F11 for 1/4 sec, ISO 100 at 20mm (full-frame equivalent).
To get here, head south from Oxbow Bend. You’ll reach an intersection after three miles -- continue south onto Hwy 26/89/191 and go about ten miles -- you’ll see the parking lot for Snake River Overlook here:
You can plan what time in the morning to be there by looking up sunrise times here -- just enter the dates you’ll be photographing:
Sunrise / Sunset times for Grand Teton National Park
Schwabacher Landing
Just south of the Snake River Overlook about 4.5 miles is Schwabacher Landing. Schwabacher Landing is a stunning area down off the road and actually on the river, so you can get reflections of the Tetons in the water. As with the Snake River Overlook, you'll want to shoot in the morning when the sun is behind you and illuminating the face of the Tetons.

Schwabacher Landing, Grand Teton National Park
While there is a dirt road that you used to be able to drive from the highway down to the landing by the water, that dirt road was closed to vehicles when we were there. If that's the case during your visit, you'll need to park along the highway and walk down. It’s not a short walk (about a mile) and while it's not extremely steep, it is long. The incline on the walk back can be tiresome, so be prepared. You may want to bring bear spray as well. Once down on the water, you can walk north along the river for a variety of vantage points.
The above photo was taken with a Canon 5D Mark II on a tripod, F11 for 1/80th sec, ISO 100 at 45mm (full-frame equivalent).
Schwabacher Landing is located here:
Moulton Barn and Mormon Row
To get to Moulton Barn, continue south on the highway about 3 miles until you see Antelope Flats Road. Make a left and follow along Antelope Flats until you come to Mormon Row. Moulton Barn will be to your right, and a few other structures will be to your left.

Moulton Barn, Grand Teton National Park
The above photo was taken with a Canon 5D Mark II, F8 for 1/640th sec, ISO 200 at 78mm (full-frame equivalent).
Drive to the right to photograph the famous Moulton Barn, which is located here:
If instead of going right, toward Moulton Barn, you make a left at the intersection, you'll drive a short distance and likely see herds of Bison in the grassy areas on either side of the road. If you can drive so that the Bison are framed by the Tetons in the back, park your car on the side of the road, and capture your images.

Bison, Grand Teton National Park
The above photo was taken with a Canon 5D Mark II, F9 for 1/640th sec, ISO 200 at 81mm (full-frame equivalent).
The image above was taken here:
Those are some of the main highlights from the HWY 26/89/191 that is open year-round. Of course there are others, like Cunningham Cabin, so explore.
The Inner Road
In addition to the highway, you can also travel the inner road which runs parallel to the highway, but a little closer to the mountains. Starting at the top of the loop, travel west / south onto Teton Park Road:
There are a variety of photo opps on the inner road, so explore, but I’ll highlight two of the main ones: Signal Mountain and Jenny Lake.
Signal Mountain
About 3 miles south of the split, you’ll find the Signal Mountain area, which has a lodge and restaurants. Nearby, you’ll find the road that takes you to the top of the Signal Mountain area, where there are scenic overlooks.

Signal Mountain, Grand Teton National Park
The road to the top can be found here:
Jenny Lake
Continue south for another 14 miles and you’ll reach the beautiful Jenny Lake area.

Jenny Lake, Grand Teton National Park
Jenny Lake is here:
If you continue traveling south, you’ll eventually reach the bottom of the Teton loop, where you can then turn north and travel the highway where all the photo opps in the previous section are located. All along the way on both roads you’ll pass beautiful scenery, so just stop the car, or hike a little, and explore as much as you can. There are so many amazing photography opportunities.
Horseback Riding
If you’re feeling particularly adventurous, you can reach some incredible and off-the-beaten-path vantage points by horseback. We took a 3-hour horseback trip with Swift Creek Outfitters / Teton Horseback Adventures and it was incredible. Our ride was the “Big Pulpit Ride” and it took us way up in the mountains into some gorgeous scenery.

Grand Teton National Park
If that seems interesting to you, their website is here: Swift Creek Outfitters / Teton Horseback Adventures
Grand Teton National Park is an absolutely amazing place to visit. The photo opportunities for landscape and wildlife photography are virtually endless. The park is just small enough so that it’s not overwhelming, but large enough to provide you with an incredibly wide variety of vantage points. Combined with its close proximity to Yellowstone, it is a fantastic photo destination.

Oxbow Bend, Grand Teton National Park
Best,
Paul
I've also created an app for iPhone, Android, and iPod Touch which teaches you photography -- more info can be found here:
Photography Trainer for iPhone and Android
Photography Trainer iPhone app
To keep up-to-date with the latest photo additions and other topics, you can become a fan at my Photography Facebook page and follow me on Twitter:
Paul Timpa Photography's Facebook
Share this guide:
![]()
If you'd like to purchase prints or stock photography licenses for my photos (for advertising and editorial use), please visit:
http://www.timpaphotography.com/purchase
Copyright 2014, Paul Timpa
Learn How to Use that New Camera you received this Holiday Season
Many people received the wonderful gift of photography this holiday season. If you're one of the lucky ones and are now the proud owner of a new D-SLR or lens, you're probably excited to start taking magical pictures!
Once you've played around with it for a bit and taken some photos on auto-mode, remember that it's the Manual mode on your new camera that really lets you take creative pictures. It's easy to learn, and if you have an iPhone or Android phone you can get download an app that will teach you how to use your camera.
The Photography Trainer app for iPhone and Android is a training tool that teaches you photography when you need it most -- when you're out with your D-SLR and taking pictures. Over 50,000 people have downloaded the app and learned how to use their D-SLRS!
The app doesn't require an internet connection, so it’s perfect for vacations and holidays too – learn photography no matter where you are in the world, whether it’s during a beautiful sunset on the beach or while you’re on a mountain top.
You’ll learn how to capture images with impact and creativity by understanding shutter speed, aperture, ISO, and how they all work together. Learn night and low-light photography, sports, wildlife, portraits, architecture, and landscape photography. You'll always have an expert with you in your pocket, there to help you take spectacular photos.
iPhone and iPod Touch users can download the app by searching on Photography Trainer in the App Store or clicking here to download from iTunes.
To download the app for Android, just search on "Photography Trainer" in the Android Market from your phone or click here: Download Photography Trainer for Android.
The app is also available on the Amazon.com Android App Store. To download with your Amazon account, click here: Download Photography Trainer from Amazon.com.
The app has three sections designed to help you:

Photography Trainer iPhone app
The Interactive Photography Trainer asks you questions about the lighting you’re in, what types of subjects you’re photographing (waterfalls, sports, city skylines, etc.) and then it guides you on how to set the camera. Most importantly, not only does it instruct you on the best settings to use, it tells you *why* to use them so that you actually learn photography in the process of using the app.
Photography Trainer iPhone app
The Photo Gallery with Camera Settings contains dozens of professional photographs, each with detailed camera settings for shutter speed, aperture, and ISO, so you can see how the settings work together in real-life examples.

Photography Trainer iPhone app
The In-Depth Techniques section has photography tutorials that go into further detail on topics such as:
* Getting razor-sharp photos
* HDR Photography
* Night photography
* Sports, Action, and Wildlife
* Composition
…and more…
Take your photography to the next level with the Photography Trainer and learn when you’re out with your camera – it’s the best time.
Facebook: http://www.facebook.com/PhotographyTrainer
To keep up-to-date with the latest photo additions and other topics, you can become a fan at my Photography Facebook page and follow me on Twitter:
Best regards,
Paul
Copyright 2009, Paul Timpa
http://www.timpaphotography.com/
![]()

Colosseum, Rome

Sedona, Arizona

Tahiti

South Street Seaport, New York City
Photography Myths
There are many "photography myths" out there. When you're just starting out in photography, it's fun to read and to learn and absorb as much information as you can. As you're learning, you may sometimes here things over and over again, that you take as fact. Some of this information may actually be long-standing myth. I've written this article to help provide some clarification on things you may have heard as you learn more about photography.
MYTH: Cloudy and rainy days are not great for photography
TRUTH: Cloudy days are some of the best days to get out with your camera. There are a variety of photographic subjects that are best taken on cloudy or overcast days, from portraits to macro and flowers, to landscapes.
For portraits, flowers, macro, insects, etc., cloudy and overcast days are often better than sunny days because of the significantly reduced contrast and shadows. When the sun is blazing, there are harsh shadows produced on the subject, whether it’s a person’s face or the delicate petals of a flower. These shadows can be a huge problem, requiring everything from flashes and external lights to diffusers and reflectors to overcome. When it’s cloudy, you get beautiful soft light on your subject. The clouds and overcast conditions act like a giant softbox, providing you with amazing soft light for portraits and flower photography. When it's cloudy out, I specifically head out to get the best flower shots!
For landscapes, thick cloud cover and even storms can create some of the most atmospheric and moody photography imaginable. This is especially true if you convert to black & white. Photos of landscapes with brooding skies, hinting at an impending storm, can have some incredible impact.

Tulip
The photo above of a tulip was taken on an overcast day. Notice how there are no harsh shadows distracting from the natural beauty of the flower.

Sedona, Arizona
The image above was taken in Sedona, Arizona on a day with thick cloud cover.
The next time it’s cloudy, get out there and try one of these types of photography and you may be surprised how happy you are with the results.
MYTH: Flash is best for indoor photos or photos at night
TRUTH: Many photographers think of the flash mostly as a tool to use in darker conditions, either indoors or at night. However, one of the best uses of flash is outside during the day in bright daylight. As mentioned in the previous myth, bright sunlight causes dark shadows on the subject, whether it’s a portrait or a flower or the foreground of a landscape. One of the easiest and best ways to improve the photo is to reduce this shadow by using your flash. (This is often called “fill flash” because its primary purpose is to fill in the shadows rather than illuminate the subject). I almost always use the flash when taking outdoor portraits. The best part is that all newer cameras handle this “fill flash” automatically, without overpowering the subject with light. Just turn on the flash and the camera will calculate the correct brightness so that the flash fills in the shadow. If you prefer the flash a bit brighter or darker than the camera chooses, you can always use the “Flash Exposure Compensation” feature available in most D-SLRs to tweak it to your liking.
MYTH: Wide Angle lenses exaggerate perspective and Telephoto lenses compress perspective
TRUTH: Perspective is the distance that objects “appear” from each other in a photo, from front-to-back. (This distance in the photo may or may not reflect "reality".) While it’s true that wide angle lenses often have the effect of exaggerating perspective and telephoto lenses may have the effect of compressing perspective, it’s important to understand that the lenses themselves actually have nothing to do with perspective. It is only your physical distance from the subject and background that determines perspective. Why is this important? Because in order to change perspective and change the way the photo looks, you need to physically move your body to a new location farther or closer to the subject. Simply changing lenses from wide-angle to telephoto will not alter the perspective in any way. The myth exists simply because when photographers use wide-angle lenses, they often move physically close to the subject, which exaggerates perspective in the final photo. When using telephoto lenses, you’re often photographing objects that are far from you – which compresses the perspective in the photo. Note that in both examples it’s the distance that has caused the effect, not the lens. If you took a photo of distant mountains with a telephoto lens, then stood in the same spot and took a photo with a wide angle lens, the mountains would like identical in both photos -- they would be compressed together because you are far away, regardless of lens. The only difference in the photos is that the wide-angle lens would include a wider “view”, meaning you’d see more to the left and right and in the foreground. The mountains however, would look the same. Keep this in mind when you’re out taking pictures. Always remember to alter your distance from the subject so that you can try out different perspectives to see how they affect the photo.
MYTH: HDR produces unnatural photos
TRUTH: Many people see HDR photos on the internet and are immediately turned off by the unnatural appearance and overly saturated, often “cartoony” look. While it’s true that these photos have likely been produced with HDR software, it’s important to realize that those photos were produced by photographers who’ve intentionally created images with that look. HDR can look incredibly natural, and very often you may not even know that a photo is HDR. It’s just easier to “notice” the over-processed, over-saturated, cartoony ones. Many of my own photos are HDR and it’s difficult to tell at first glance. Sometimes, after a while, I occasionally forget which ones of my own are HDR! HDR is incredibly useful for architecture, interiors, landscapes, and a wide variety of subjects. Once you learn the software, you’ll be able to create natural looking images that have the extra dynamic range (bright and dark tones) but still look very “real”.

South Street Seaport
The photo of NYC's South Street Seaport above is an HDR photo and would not have been possible without using HDR techniques.
MYTH: When shooting landscapes, you should stop down your lens to the smallest aperture to ensure everything is in focus
TRUTH: Using the smallest aperture on your lens degrades image quality and is rarely necessary. Due to the way lenses are built, when you use a tiny aperture like F22 or F32, the photo can actually get less sharp because of something called "diffraction". Technically, the depth-of-field will be maximized and everything will be "in focus" -- however the overall image quality will suffer and be more blurry than if you had used a slightly wider aperture. You'll often find that apertures like F14 or F16 are sufficient for many landscapes, and will result in sharper photos that are still in focus. I rarely shoot at an aperture smaller than F16.
MYTH: It’s always a good idea to use a UV filter on your lens
TRUTH: Opinions vary on the use of UV filters. For me personally, I don’t recommend using UV filters for most photography. Of course this is just my personal opinion, and I respect those who wish to use them for an added layer of protection. However, it’s important to understand a few things about UV filters and lenses in general. Firstly, lenses today are pretty tough. They’re built to take the standard knocks and bangs you might encounter. If you’re especially accident-prone, then perhaps it may make sense to use one for protecting the front lens element, but otherwise, I suggest leaving it off. This is because from a “UV” and “haze” perspective, I’ve found they do very little to improve the photo. On the down side however, using a UV filter can definitely introduce unwanted flare in your photos. Flare is usually seen as several large, colored or white blobs in your photo. This is caused when bright light sources shine directly on the front lens element. Using a UV filter adds an additional layer of glass which increases the chance of light bouncing around and causing reflections and flare. Any type of photography where there are bright lights on the lens, such as sunsets or sunrises, or night photography where there are streetlights, etc., can be negatively affected by UV filters. For these types of photography especially, I recommend removing the UV filter. The only times I could see needing them is if for example you’re on a beach and there is a lot sand blowing around, or if you’re walking through a hiking trail and branches are frequently whipping at the front of the camera. Or perhaps you’re on a boat and there is salt-water splashing up. In those extreme examples, I could see if someone wanted to use a UV filter. Otherwise, I recommend leaving them off for the best possible image quality.
MYTH: Full-frame cameras are better than APS-C or Micro-Four-Thirds cameras
TRUTH: First let me say that just about any D-SLR on the market today is capable of taking incredible, professional-quality photos. I’m a firm believer in “It’s not the camera, it’s the photographer.” Even so, many photographers see the full-frame camera as the ultimate format to own. While it’s true that full-frame cameras may often provide some of the best overall image quality of the various camera formats, it’s also true that full-frame cameras may not be the best cameras for all types of photography. For example, Canon’s two full-frame cameras the 1Ds Mark III and 5D Mark II, shoot at 5 frames-per-second and 3.9 frames-per-second. While this is just fine for landscape and studio photography, it may not be fast enough for fast-action sports or racing. By contrast, Canon’s 1D Mark IV (a non-full frame camera) shoots at 10fps, twice the speed of Canon’s fastest full-frame camera. The 7D shoots at 8fps. If you shoot a lot of wildlife or sports, you may also be interested in choosing a non-full-frame camera. Without getting into the technical details, just know that non-full-framers have the “effect” of adding extra telephoto reach to any lens. For example, if you buy a Canon 400mm lens, it basically acts as 640mm lens on a Canon 7D. By contrast, that same lens on a 5D is 400mm. The price of a 600mm lens (which is what you would need on a 5D to equal the reach of a 400mm lens on a 7D) is much higher than a 400mm lens by several thousand dollars. So you save a lot of money by using a 7D and getting 640mm out of a 400mm lens!
MYTH: It’s always best to photograph landscapes and architecture with a wide-angle lens, and to take sports and wildlife with a telephoto.
TRUTH: While it’s true that most often landscapes and architecture are photographed with wider angles and that sports and wildlife photographers lean toward telephotos, there are plenty of times when you’ll want to do the opposite. Using telephotos for landscapes can be perfect for picking out important details or isolating a subject. You can also photograph scenes that are far away, and because of the compressing of perspective that is caused by the distance, you can get fabulously layered photos that are really interesting. Similarly, you can use telephotos in architecture to highlight certain details that may otherwise be lost in a wide-angle shot. One of the most useful times to use a telephoto for architecture is when you’re trying to avoid “converging verticals”, that pyramid effect that happens when you’re close to a tall building and shoot with a wide-angle lens pointed upwards. To avoid the lines of the building slanting inwards, use a telephoto lens and stand further back from the building. This allows you to keep the camera pointed straight ahead, rather than pointed upwards. When the camera is pointed straight ahead, you don’t get the slanted lines.
Telephotos are often used for sports and wildlife to bring the athlete or animal closer, but sometimes it’s great to see the subject in its environment. Some of my most favorite wildlife photos are silhouettes of a deer on a mountaintop with a gorgeous sunset in the background, taken at a wide angle. It can really add to wildlife photos if you can show the beautiful surroundings where the animals live.

St. Peter's Basilica
The photo above of St. Peter's Basilica in Italy was taken with a 70-200mm telephoto zoom lens from very far away.
MYTH: Low ISOs produce the best picture quality
TRUTH: While technically this is true, it’s important to understand the larger context of how ISO works. From a pure “image quality” perspective, low ISOs produce images that are clean and noise-free. However, low ISOs require you to use longer shutter speeds, which is what causes blurry photos. In almost all cases, it is better to have a noisy photo that is pin-sharp, than a noiseless photo that is blurry! Because of this, it’s important to make sure that you use a shutter speed that is fast enough to prevent blur, even if that means raising the ISO to 800, 1600, or higher. High ISOs also allow you to use a narrower aperture when shooting handheld, which increases depth-of-field ensuring everything is in focus. Today’s cameras are getting better and better at handling noise at high ISOs, so don’t be afraid to use them as necessary. Of course, if you’re using a tripod and shutter speed is not relevant, go ahead and use the lowest ISO to ensure the cleanest photo.
MYTH: A D-SLR is always better than a compact
TRUTH: Sometimes it’s easy to think that a D-SLR is better than a compact camera in all situations. You’ll often find this is not the case. Here are a couple of scenarios where a compact camera may be a better choice.
* Compact cameras are great for macro photography. It is difficult and expensive to design true macro lenses for D-SLRs. In addition, the small depth-of-field of D-SLRs compared to compacts forces you to stop-down your lens to tiny apertures like F22 to get everything in focus. These small apertures require long shutter speeds, and that’s why you almost always need a tripod with D-SLRs for macro photography where focus is critical. Compact cameras on the other hand naturally have a lot of depth of field. You can take amazing macro photos, without a tripod, with most compacts, even the inexpensive ones. Compact cameras are a great way to experiment with macro photography.
* Compact cameras are great for street photography or any photography where you don’t want to draw a lot of attention to yourself and your gear. There are many occasions and places where you may want to blend into the crowd to get more “natural” shots of people and places, whether it’s a bustling city or simply a friend's party where you’re snapping some candids. Compact cameras are great for this purpose.
* Compact cameras are the best and often only choice when you need to travel light. We’ve all heard the phrase before: The best camera is the one you have with you. (They also say that about tripods.) It’s true -- If the option is no camera at all or bringing along a compact, the compact of course wins every time. Whether it’s going on a long hike somewhere, or diving into the ocean with a small waterproof compact, there are many places where a D-SLR can be just too large, heavy, and cumbersome to bring along. Compacts are great for filling in, and many of the new advanced models have full manual control and outstanding image quality. I went hiking across the summit of Mt. Kilauea, Hawaii, with just my Canon S90 compact, and I can’t tell you how happy I was to not have my D-SLR. The hike would have been incredibly difficult otherwise. With the manual controls and a lightweight tripod, I was still able to capture long-exposure shots of the glow from the lava pools.
MYTH: Lightning photography requires special gear or quick reflexes
TRUTH: As you may have seen in my more in-depth article on Lightning Photography, photographing a lightning storm has little to do with special gear and quick reflexes. It’s simply a matter of using long shutter speeds and a bit of patience to capture the lighting. Using manual mode, set the shutter speed to around 30 seconds, and an aperture and ISO that suits the scene. Then just click the shutter and wait for lightning to strike!

Lightning Strike over NYC
MYTH: Professional photography is a glamorous job of jet setting, models, and exotic locations
TRUTH: Many people dream of being a professional photographer and one day traveling the globe taking photos of exotic locales or photographing models on the beach. The job can certainly seem glamorous and extremely fun, and on rare occasions it can be just that, but more often than not, professional photography is just like any other job. You’ve probably heard this before, but pro photography is probably 20% photography and 80% running your own “business”. That business is just like any other business, and running it involves all the activities of accounting, billing and invoicing, marketing, advertising and sales, administrative work, managing client relationships, etc. You may be amazed to find out how little actual photography there is! Also, many pro photographers generate income not just from photoshoots, but a variety of other “photography-related” pursuits. For example, despite generating income by working for my architectural clients, I also hold photography workshops, I sell prints of existing work as art, I have my iPhone app, etc. You’ll need to be able to juggle a lot of different photography activities, all while running the business side of things and handling the sales, marketing, and accounting. It’s a tough career!
MYTH: You don’t need a tripod these days, because high ISOs allow low-light handheld shooting
TRUTH: High ISOs do allow you to handhold the camera in dim conditions that previously required a tripod. However, these high ISOs are purely used to obtain a fast shutter speed. For me, the beauty of the tripod is that it allows long-exposure photography, something that ISO cannot help with. Long exposure photography is one of my favorite techniques in photography, because it allows the camera to capture “motion”, which adds so much interest to the photo. That motion can be the rushing water of a waterfall or stream, the car light trails in a nighttime cityscape, or the hustle and bustle of people. None of these types of photos are possible without a tripod, so you’re missing out on a whole world of photography without one. Perhaps even more importantly, a tripod is required if you want to do any kind of exposure blending, whether manually or using HDR software. You may already know that cameras are not great at capturing a wide range of brights and darks in a single photo. Exposure blending is simply the process of taking two or more photos at varying brightness levels and combining them on the computer afterwards so that all the brightness levels of the scene are present in the photo. This cannot be done without a tripod because all the photos at different brightnesses must be taken with the camera in the exact same position, so that combining them on the computer is easy. Sure, you can attempt to hold the camera very steady to try this technique, but for serious photography, a tripod is necessary to do it right.

Colosseum, Rome, Italy
MYTH: Great wildlife shots require an expensive African safari
TRUTH: I’ve seen beautiful and incredibly natural wildlife photography that’s been captured in a zoo or local wildlife preserve. The key when capturing the picture is to take special care and attention to eliminate all of the “man-made” features surrounding the animal. For example, this can be done by using a telephoto lens so that just the animal is in the frame and you can’t see the man-made background elements. If the background is going to be visible in the frame, you can also use the widest possible aperture on your lens. This can blur the background to a wash of color where it’s impossible to tell what’s behind the wildlife. When photographing through glass enclosures, be sure to turn off the flash to eliminate reflections. Also get as close to the glass as possible, even pressing the front of the lens right onto the glass to ensure there are no reflections. When done properly, you may find you can take very natural wildlife photos very close to home.
MYTH: Setting your images to 72dpi is important for displaying them on a computer screen
TRUTH: To this day, I’m unable to determine the origin of this myth. The truth is that when it comes to displaying your images on a computer screen, the dpi (dots per inch) you see in your editing software is completely irrelevant. The size of your images displayed on a computer screen is only related to the dimensions of the image in pixels, for example 1200x800 pixels or 640x480 pixels. The larger the image in pixels, the larger it will appear on screen. Ignore any references to setting your images to 72dpi for on-screen viewing.
MYTH: Using image editing software is “cheating”
TRUTH: This is one of the most commonly discussed topics in all of photography. Everyone has their own opinion on it. The reality is this: No digital image produced today is completely unmanipulated. Even if you don’t personally Photoshop the image or fiddle with the adjustment controls on the camera, the digital photo itself is manipulated by the camera’s settings for saturation, contrast, etc. There’s no difference in choosing the black & white mode on your camera which desaturates the image, or the Landscape mode which intensifies blues and greens, than doing it afterwards on the computer. With film, images are adjusted in the darkroom in very much the same way, for brightness, saturation, contrast, etc, as well as dodging and burning to bring out specific details. Photographers throughout time have adjusted their images to make the best representation of what they saw. Many people like to do a little extra “adjusting” and that’s just fine – photography is art. Really the only area where minimal adjustment is required is in photojournalism. For my personal style, I prefer to keep it natural, especially with my travel and architecture photography where I know the images I capture need to represent reality. If you wish to enhance your images to make beautiful art for all to enjoy, I wholeheartedly encourage you to do so! It’s all up to you.
If you have any questions about these or any other myths you may have heard, please let me know.
I've also created an app for iPhone, Android, and iPod Touch which teaches you photography -- more info can be found here:
Photography Trainer for iPhone and Android
Photography Trainer iPhone app
Best Regards,
Paul
To keep up-to-date with the latest photo additions and other topics, you can also become a fan at my Photography Facebook page at:
Paul Timpa Photography's Facebook Page
If you'd like to purchase prints or stock photography licenses for my photos (for advertising and editorial use), please visit:
http://www.timpaphotography.com/purchase
Share this Tutorial with friends:
Share
Copyright 2009, Paul Timpa
http://www.timpaphotography.com/
Photography Trainer app now availiable for purchase on Amazon
Photography Trainer, the best-selling app that teaches you photography when you're out with your D-SLR, is now available for download from Amazon.com for Android phones.
You’ll learn how to capture images with impact and creativity by understanding shutter speed, aperture, ISO, and how they all work together. Learn night and low-light photography, sports, wildlife, portraits, architecture, and landscape photography. You'll always have an expert with you in your pocket, there to help you take spectacular photos.
To download with your Amazon account, click here: Download Photography Trainer from Amazon.com.
* Please note that purchasing on Amazon is only available to U.S. customers on Verizon and Sprint. AT&T and additional countries will be supported shortly.
Of course you can still purchase it from Google's Android Market by clicking here: Download Photography Trainer for Android.
iPhone and iPod Touch users can download the app by searching on Photography Trainer in the App Store or clicking here to download from iTunes.
The app has three sections designed to help you:
Photography Trainer iPhone app
The Interactive Photography Trainer asks you questions about the lighting you’re in, what types of subjects you’re photographing (waterfalls, sports, city skylines, etc.) and then it guides you on how to set the camera. Most importantly, not only does it instruct you on the best settings to use, it tells you *why* to use them so that you actually learn photography in the process of using the app.
Photography Trainer iPhone app
The Photo Gallery with Camera Settings contains dozens of professional photographs, each with detailed camera settings for shutter speed, aperture, and ISO, so you can see how the settings work together in real-life examples.
Photography Trainer iPhone app
The In-Depth Techniques section has photography tutorials that go into further detail on topics such as:
* Getting razor-sharp photos
* HDR Photography
* Night photography
* Sports, Action, and Wildlife
* Composition
…and more…
Take your photography to the next level with the Photography Trainer and learn when you’re out with your camera – it’s the best time.
Facebook: http://www.facebook.com/PhotographyTrainer
Best regards,
Paul
Copyright 2009, Paul Timpa
http://www.timpaphotography.com/
![]()
Colosseum, Rome
Sedona, Arizona
Tahiti
South Street Seaport, New York City

Follow @TimpaPhoto
Learn photography with my "Photography Trainer" app for Android
Paul Timpa on Google+
Paul Timpa Photography's Facebook
Pages
Archives
- February 2016
- August 2015
- May 2014
- February 2014
- January 2014
- December 2011
- April 2011
- March 2011
- October 2010
- September 2010
- July 2010
- June 2010
- May 2010
- April 2010
- March 2010
- January 2010
- November 2009
- August 2009
- July 2009
- May 2009
- April 2009
- March 2009
- February 2009
Categories
- * Tutorials List *
- action
- Aerial Photography
- Android
- app
- Architectural Photography
- camera buying guide
- Choosing a DSLR
- Color Management
- Droid
- Facebook Tutorials List
- filters
- Fireworks
- Focal Length
- HDR
- HDR Photography
- Helicopter Photography
- High Dynamic Range
- How to Approach a Scene and Set the Camera
- How to use your first D-SLR
- iOS
- iPad
- iPhone
- iPhone app
- iPod Touch
- Italy
- Landscape Photography
- layers
- Lightning Photography
- Live View
- Low Light
- Manual Mode
- Milky Way
- mobile app
- Monitor Calibration
- New York City
- Night Photography
- Night Pictures
- NYC
- Paul Timpa Photography
- Photography
- Photography Trainer
- Photomatix
- pictures
- Printing
- RAW Files
- RAW vs. JPEG
- Rome
- sharp
- sharp photos
- sharp pictures
- sports
- Stock Photography
- sunset portraits
- sunsets
- Timpa Photography
- Tips and Tricks
- Tips for point-and-shoot cameras
- training
- Travel Guide
- travel photography
- Uncategorized
- Using Live View
- What camera to Buy
- wildlife